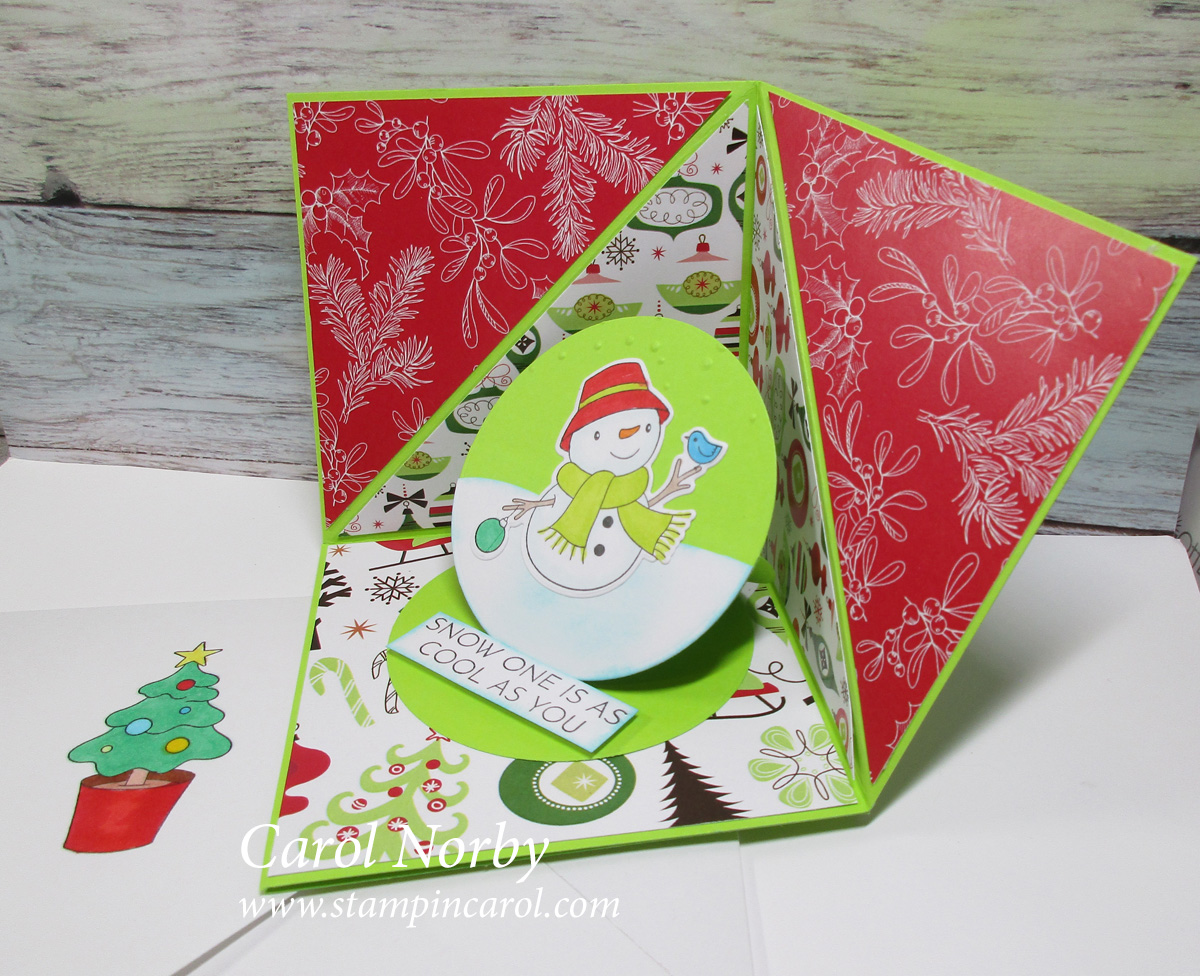
Tuesday, December 22, 2009

Take a peep at this!

We have an annual family Christmas party and do a gift exchange. Everyone draws a number and when your number is drawn you can either pick a gift or steal one. This year I made these Holiday S'More jars. I think the little snowman peeps are just adorable!

I used one of our Purchase with Purchase sets to stamp the recipe card. It's called Holly Jolly and you get 3 smalls stamps for $2.95 with a qualifying $30 order.


This is a closeup of the lid. I used the Christmas Circles and Tag Tidbits sets along with the Giga Scallop Circle, Mega Circle, and Extra Jumbo Circle punches. I used L'Amore and Viridian Leaf PH inks. Can you see where I used my Souffle Gel pens on the holly of the large circle? I also use Pop Dots to raise up the ornament circle.

And here's what went into each wide-mouth quart jar:
1 1/2 c. crushed graham crackers, packed into the jar bottom
Seasonal Peeps, placed around the inside leaving the middle open
1/3 cup packed brown sugar, added gently within the circle of the peeps and lightly packed
1 1/4 cup M&Ms or choc. chips, gently added to the top of the jar.
Seal with lid and sealer ring.
Decorate jar as desired.

The recipe card attached reads:
Holly Jolly Snowman S'Mores
1. Empty the jar contents into a bowl. Snip the peeps into bits with kitchen shears or cut up with a knife. Return the bits to the mixture and mix well.
2. Melt 1/2 cup butter, add 1 teaspoon vanilla extract. Pour this over the dry ingredients, mixing well. Pat into a greased 8" or 9" square pan.
3. Bake at 350 degrees for 15 minutes. Cool and cut into bars. Enjoy!

Sunday, December 20, 2009

Beyond Measure

Are you getting tired of the challenges from Paper Wings during our Holiday Celebration? Well, here's one from a sketch challenge.


The colored paper is from DCWV. The loopy white pieces are from a package of Bazzill white Cardstock strips. Cool stuff! I used Beyond Measure hostess set and Watercolor Plants stamps and my Bordeaux PH ink.


Here's a closeup of the card. Can you see the little circles in the background? They were created using the Background Builder hostess set and Frost Dazzle Versamark ink. Just a little pizzaz. I like the sketch as it creates a clean simple card. What do you think?

Friday, December 18, 2009

It's out of the box...

This card is the result of another Paper Wings challenge during the Holiday Celebration we had last week.


I used some TAC™ retired paper called Kamalaht. The stamp is from the Hieroglyph Horses. Isn't it cool! I used a technique from the newest Technique Junkies newsletter to create the horse. I also used Versamark Ink, Noir PH ink, Transcendence Embossing Powder, my brayer, black cardstock, and 5 mini black brads. The line where the brads are located is actually a design in the paper so I took advantage of it to line up the brads.


Here's a closeup of the horse. It and the black paper are all one piece. This would make a cool masculine card. I will have to play with this technique some more!

Wednesday, December 16, 2009

I'm seeing circles everywhere!

This card is the result of a "Bingo" game on Paper Wings last week during our Holiday Celebration. We were given a list of stamp sets from which we chose 16 sets that we had in our stock. The caller would call a set every so often and, if we had that set, we had to create a card and upload it to the gallery. The first angel to upload 4 cards won. Well, I didn't win. I only had 2 of the called sets.

Christmas Circles was the set called. I decided to use Pop Rockz SWIC since it has a sheet of circles paper. I stamped noel from the Tag Tidbits set in each circle with Bordeaux PH ink.


I stamped the 2 different circles on white cardstock and punched each out using the Mega Circle and Extra Jumbo circle punches. I also used the little phrase from the Tag Tidbits since it fit so nicely in the small circle. The green ink is Chartreuse Ph ink. Can you see where I used my Stardust Clear Gel pen?? And the ribbon is from my stash. Oh, I also used Pop Dots to raise the circles for more dimension. I think I'm done making Christmas cards for a while. But I'm still sending cards!! Did you get all yours out??

I had some problems publishing this post, it was supposed to go live on the 20th! Oh well, you get 2 posts today!

Let the Earth be glad!

Have you ever purchased a pack of really cool paper and there was a sheet of tags in it? Have you had brain burbs as to what to do with them? It's even harder to use them as the focal point of a card! That was a challenge on Paper Wings last week.


I started with More Mimi SWIC and tag. I stamped the tag in Noir PH ink with a phrase from our Be Still set. It's one of my favorites! I run some Mimi ribbon through the tag and added some more of the paper as a backing on the tag so that it would show up on the card. I edged the background piece with Burnt Umber PH ink. I used various Bitty Blossoms and paper posies as embellishments along with some Lime Green Scrappers Floss and a safety pin!


Here is a closeup of the ribbon tie, floss and safety pin. It just doesn't photo that well but you get the idea! This card can be used for almost any occasion but I don't think a guy would appreciate it! LOL!

Monday, December 14, 2009

I've been mugged!

I was challenged to use a set that I purchased but never inked. Well, the mug is it!


This mug is one of our great Hostess stamps that you can receive FREE with a $100 net order! Isn't it cool!! I also used the set Just Because and used my Noir PH ink for both. The paper is Mimi SWIC which is now replaced by the More Mimi SWIC! The More Mimi is double-sided. I colored the mug using my Prismacolor H20 pencils and a blender pen. I also used Mimi Ribbon to cover the joint of the 2 pattern papers.


Here you can see that I added some bling using my Stardust Clear Gel pen. I think I mentioned that it is my favorite bling maker!

Now that I have this posted I think I'll go make me a cup of hot chocolate!

Saturday, December 12, 2009

More Paper Wings challenges...

I got to play again with a challenge. We were given a picture of a really cool stack of red, black, and white polka-dotted packages to draw inspiration. This is my take:


Stamps: Build a Background Hostess Set, Sprigs and Little Cupcake
Inks: Noir & L'Amore PH inks
Cardstocks: red, black and white
Flower: Neutral Mix Bitty Blossom
Other: red brad, Stardust Clear Gel pen, Prismacolor Pencils, Pop Dots


Here you can see the little candle and the glitter that I added. It just needed that little bling. I like how this turned out. What do you think??

Thursday, December 10, 2009

Paper Wings Challenge.... and result

We had a great challenge for us "angels" over on Paper Wings Tuesday. It was a "Limited Supply" challenge... we were only allowed certain things that we could use. The challenge was:

one 3x3 sheet of color cardstock
one 2.5 x2.5 sheet of white cardstock
one 2x2 sheet of colored cardstock
snowflake stamp
1 image of your choice
1 ink pad color of your choice
black ink


Here's what I can up with. I used a small snowflake from the Ornamental Snowflake set and stamped on the dark green cardstock using Brilliance Moonlight White ink and swiped the white on the edges. I punched my white cardstock with an EK Success pine tree border punch. Then I stamped the pine bough from the Good Timber set with Noir PH ink on my light green cardstock. Can you see the white on the needles and branch?


I used my White Gel pen to accent the branch to give a hint of snow! I also sanded the edge of the paper using a sanding block for a bit more emphasis.


I decided to use this little creation on a card so I created this card. Again I used the small snowflake and white ink on the light green card, added the 1" sheer green ribbon. I dug out the snowflake punch, punched 2 out of white, and added the little brad that almost matches the light green paper. I also used my color duster and added just a hint of Starry Night PH ink on the edges of the punched snowflakes before assembling. The text is from the Be Still set and stamped in Noir ink. I really like how this turned out! What do you think??

I hope to get a couple more challenges done this week and get them posted. My life is starting to get crazy with Christmas right around the corner. I have yet to finish some gifts and get them wrapped and mailed!! I still have 2 that haven't arrived yet!! Hopefully... How are you coming along with your Christmas preparations??

Tuesday, December 8, 2009

I'm mailing out some of my Christmas cards!

Yesterday I addressed about 20 envelopes and started writing in my cards. What a job! So, I needed a little break since I haven't been creative this past few days. One reason is that our daughter from Cheyenne, WY came to visit! I think we had a great time!

Anyway, here's the card I made. Over on Paper Wings we are having a Holiday Challenge lasting all week. Sunday's challenge... create a Christmas card using the traditional colors of red, green, and white.


The green cardstockss are by Bazzil. I used the Joy of Christmas set and stamped with L'Amore PH ink on the white and Frost Dazzle VersaMark ink on the green. Since my mojo has blown away with the wind last night I ended up with a real simple card.


Here is a close up of the Frost Dazzle ink. It really shimmers! I added the 3 red brads since I thought the card needed something more.

I hope to become more creative soon. Saturday we are going to Phoenix to attend a memorial for my oldest aunt who died recently. I need to decorate for Christmas soon, too. Yesterday I did make some Pumpkin Pie Bars and Pumpkin Nut Muffins. My brother and sister-in-law will be arriving around the 19th so I need to get lots done. I will try not to miss posting on even numbered days but if I do, please forgive me! Now, off to get more done!

Sunday, December 6, 2009

New monthly drawing from TAC™!

Enter to WIN this More Mimi™ Package!

What you could win!!!
• More Mimi™ SWIC™
retail value: $8.50
• Mimi™ Cardstock
retail value: $6.50
• Mimi™ Ribbon
retail value: $4.95
• Mimi™ Hardware
retail value: $4.50


Total retail value: $24.45

(I'm having trouble getting the picture, sorry.)

Click HERE for the direct link!! Remember to follow the directions! Best wishes for your win!


What are these?

Since our daughter is here from Wyoming I haven't been creating. But I just had to post this....

A friend gave these 3 antique tools to me and we both don't know what they are. I think they have to do with sewing of some kind.


The 2 big ones have sliding handles. One handle tip has a "needle" with a hole and the other has a metal strip. The one on the right has "guides" for the thread or whatever.


Here's a closeup of the one on the left. You can just see the little metal piece under the "needle".


Here's the little middle one. It has an extra "needle" stored in the handle.


And here's the one on the right.

If you have any ideas what these are please let me know. Or if you know someone who knows please have them look at these. Thanks.

Friday, December 4, 2009

December Specials

Did you notice that I updated the Specials for the month?? The slideshow is in the sidebar! Check out the cool Stamp of the Month set of stuffed animals! Or how about the Vintage set of a Snowman family!! Just too cool! (Pun intended.)

TAC™ Grab Bags Available!!

We have a limited supply of these absolutely INCREDIBLE grab bags that are available ONLY while supplies last! This grab bag comes in a plastic bag and contains 3 full sheets of Creative Cling(tm), and COMPLETE stamp sets that cover the sheet of Creative Cling(tm). Stamps included have been previously discontinued and/or are from past events. The picture is only a sample of what is in the bag, and not the actual sets you will receive! But the suspense of what you will receive is the fun of a grab bag!

The retail value of this grab bag is over $145.00! We are offering this, WHILE SUPPLIES LAST, at a COMMISSIONABLE price of $50.00. You read that right! $50.00!

If you are interested in this great deal you must contact me ASAP as they won't last long!!

Gotta show some sympathy...

I recently had to make a sympathy card and decided to use a couple patterns from the free downloads that TAC™ offers. Since I was running out of ink the paper printed pink & black instead of white & black. Great effect! I did layer them on black cardstock.


I used 2 stamp sets, With Sympathy and Watercolor Plants. The flowers were stamped with Pink Petunia VM ink, I stamped off on scrap paper once before stamping on the circle to get a softer look. The text was stamped in Noir PH. I used 3 punches, the Mega Circle, the Giga Scallop Circle, and a 3" Circle. The ribbon I got at a discount store. This is a simple and fast card to make. I used black, white and pink cardstocks. Turned out pretty nice and I think the recipient will appreciate it.

Wednesday, December 2, 2009

Another Oval Frame

Here's the last of the 3 oval frames. I'm also working on a small square one but it's not done yet! Again, there's no stamping on this one.


This is covered with paper from the Pop Rockz SWIC collection. I realized when going through my paper collections that I'm getting down and need to replenish! Anyway, I painted the frame green before adhering the paper then covered with a coat of decoupage medium. The flowers are from the Garden Mix Bitty Blossoms jar. I then added the buttons and white scrappers floss. In case you're wondering I used a skewer to curl the floss. I love this look.


I found this button in Ava Embellishment Jar and added a large yellow brad in the center. Cool look!

I hope you know by now that most of the supplies I use are a link to my online shopping cart. Check it out! Should you want some stamps and supplies you can shop from the ease of you chair! Have a cup of coffee/tea and don't worry about getting dressed! No crowds! And your order will be shipped directly to you! The shipping is $6.95 or 10%, whichever is greater. I understand this is normal and no, we don't have free shipping during the holidays. If you have any questions about my projects, please feel free to contact me and I'll help you.

Monday, November 30, 2009

Blue Paisley Frame

Here's another picture frame I made. I have yet to decide what I'll do with these frames since I gave so many last year as gifts. Anyway, you'll notice there is NO stamping!! Oh my gosh!! I may add something later, depends on what I decide to do with this.


This paisley paper is from TAC's Pop Rockz SWIC collection. I again painted the frame edges then decoupaged after adhering the paper.


The flowers are from the Assorted Bitty Blossums that we used to sell. We now carry the Neutral Mix and the Garden Mix Bitty Blossoms which would have these colors. I added the buttons and the white and turquoise scrappers floss for added embellishments.

I have one more frame that's finished that I'll post next. I hope you're getting some inspiration from these frames. They are easy and fairly quick to make. And the frames are from Michaels crafts store for about $1 - 2 each.

Sunday, November 29, 2009

Card winning quote...

I just got the following from Trudy O. who won the 2 dozen Christmas cards:

"Thanks Carol...I had your package in the mailbox when I arrived home this morning. Those cards were pretty on line, but they are sooo much better IRL...thanks so much"

Thanks to Trudy for letting me know the cards arrived! And that you like them!! I will be doing a drawing for product when my "blogiversary" comes! Keep watch! I have a countdown in the sidebar!

Saturday, November 28, 2009

Family Portrait

We had our portrait taken this summer and I decided to play with a frame so the 2 came together today. I had to take the photo at an angle as I used some acetate over the photo and the light caused reflections. The tag at the bottom is not off balance.

I used Reece SWIC paper and tag for this. The date is stamped from a retired set and stamped with Burnt Umber PH ink. I used Prima flowers, buttons, and white & lime green scrappers floss. I painted the frame brown before I added the paper. Hmmm..... This may end up as a Christmas gift.

I've already started my shopping. We did a few minutes of Black Friday shopping at Walmart - didn't get there until after 8 am and the crowds were tremendous! But we got what we wanted and left! Now I remember why I don't like shopping the day after Thanksgiving!! Did you shop? Did you find what you wanted? Get some great ideas?? Today we're in Tucson at the Tucson Mall then to a niece's birthday party at the Pima Air Museum. Long day coming on!

Friday, November 27, 2009

Hang it up!

The local AZ Scrapbooking store in Green Valley, AZ asked those of us who teach there to create an ornament. They will be handing out the chipboard shape and having a contest for their customers to decorate these for assorted themes and prizes. Of course, us teachers are exempt but I hope mine inspires someone!

I can't remember the name of the paper other than it's be Basic Grey. The Rejoice is from a retired set called Whimsical Greetings and I stamped it with Red Brick VM ink and embossed using Transcendence Embossing Powder. (This is the best clear embossing powder! Can be used on dye ink!!) I used the Mega Scallop Oval and Super Jumbo Scallop Oval punches.


Can you see where I used my Stardust Clear Gel pen?? It's on the Basic Grey paper and the dots on the scallops! I also used a quarter piece of hydra sponge and Chartreuse PH ink on the small scallop for emphasis.


This cool leaping reindeer is from the Reideer Food set. It is available for a short time so if you're interested in it you must order it soon!! Again I used Brick Red VM ink and Transcendence embossing. I also used my White Gel pen for embellishment around the ovals. Oh, the swirls on the edge of the small oval were stamped with Chartreuse PH ink. The red and brown cardstocks are actually 1 sheet of Core'dinations paper! It's double-sided! Love that stuff!

I used some green braiding cord to line the edge of the ornament and for the hanger. And these beads are from the ribbon of beads. I think they were a great touch at the bottom of this ornament. You can also see where I used the Stardust Clear Gel pen on those little dots on the swirls around the edge of the white piece. It was also used on the swirls within the reindeer.

I hope to get this back after Christmas. Now to figure out where to put my initials! Are you getting ready for Christmas?? Got your cards done? Tree out? Gifts purchased? Anyway, you don't have much time left!! Less than a month! Wahoo!

Tuesday, November 24, 2009

Abraham Lincoln's Thanksgiving Proclamation

I added Lincoln's Proclamation to my personal blog today. Great history! Just scroll down the left sidebar to the Link! Thanks!